
Dragons are among the most fascinating creatures in mythology, with their mighty wings, sharp claws, and fiery breath. For centuries, they’ve been a symbol of power, mystery, and fantasy. If you’ve ever dreamed of creating your own dragon, you’ve probably wondered, how to draw a dragon? The good news is that drawing these legendary creatures isn’t as hard as it might seem.
In this guide, we’ll take you through the steps of drawing a dragon—from imagining its world to finalizing the details. By the end, you’ll have the skills to sketch your very own dragon, ready to soar through your imagination.

Step 1: Visualize Your Dragon’s World
Before picking up your pencil, think about the kind of dragon you want to create. Is it a fierce fire-breather, or a calm guardian of ancient forests? Dragons come in many forms—each with its own personality and characteristics.
Start by imagining your dragon’s environment. If it’s a desert dragon, its scales might resemble cracked stone. If it’s from the icy mountains, you might give it frosty features or shimmering, ice-blue scales. The environment you choose will influence the shape, size, and even color of your dragon.
By asking yourself how to draw a dragon, you’re also asking about what kind of dragon you want to bring to life. Let your imagination run wild—this is your dragon, and it can be as unique as you want.
Step 2: Begin with Simple Shapes
Every dragon begins with a few basic shapes. These simple structures will serve as your dragon’s framework. Start by drawing a small circle for the head and an oval for the body. Then, lightly sketch lines that connect these shapes to form the neck and tail.
Next, add rectangles or smaller ovals for the legs. Don’t worry about getting the details right at this stage—focus on the overall proportions and posture. Think of this step as building a skeleton. The goal is to lay out the basic framework, which will later support the intricate details of your dragon.
For those new to how to draw a dragon, it’s easy to become frustrated when it doesn’t look perfect right away. But remember, every artist starts with these rough shapes—perfection comes later!
Step 3: Shape the Head, Body, and Limbs
Now that you have the basic outline, it’s time to refine the shapes into a more dragon-like form. Start with the head—refine the shape of the snout, add some curves for the jawline, and sketch the eyes. If you want a more menacing look, you could make the eyes sharp and angular.
For the body, use curved lines to shape the muscles and give your dragon some personality. Does it have a long, slender body or a short and stocky one? The posture and build of the body will reflect the dragon’s lifestyle—an agile dragon might have a sleeker build, while a more powerful one might be bulkier.
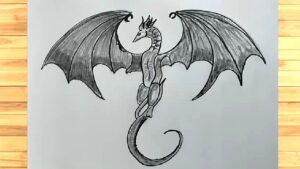
For the wings, begin sketching long, pointed fingers that will become the wing bones. Then, add skin-like membranes between the bones. You could give the dragon bat-like wings, or something more unique—perhaps feathered or webbed wings for a different flair.
At this point, you can also define the legs and tail, adding claws, spikes, or other features depending on your dragon’s personality.
Step 4: Add Details to Bring Your Dragon to Life
Now comes the fun part—adding the details that make your dragon stand out. Start with the face. Give it sharp, fierce eyes, a nostril flare, and perhaps some horns. You could even add small frills around the neck or on top of the head.
Next, begin adding texture to the body. Draw small curved lines to indicate scales, or use jagged lines to create rough, rocky skin. Dragons aren’t just reptiles—they’re often depicted as mythical beasts with exaggerated features. So, feel free to get creative with the texture!
For the wings, add veins or soft lines to suggest a more detailed membrane. Don’t forget to sketch claws on the dragon’s limbs and tail. The more intricate the details, the more life your dragon will have.
Remember, how to draw a dragon isn’t about copying others—it’s about making this creature uniquely yours. Make choices that fit your vision and make your dragon feel real.
Step 5: Add Shading and Depth
Once your dragon’s outline and details are in place, it’s time to focus on shading. This is a crucial step in making your drawing look three-dimensional and dynamic. Start by determining where the light source is coming from. Typically, light shines from above or from one side.
Use your pencil to darken areas that are opposite the light, like the undersides of the wings, beneath the neck, and along the tail. Add shading to the ridges and folds of the body to suggest volume.
For the wings, use smooth, soft strokes to create a translucent effect. You can also use shading to enhance the textures—darkening around scales will make them appear raised, while lighter areas will highlight their reflective quality.
Step 6: Final Touches and Color (Optional)
At this stage, your dragon should already look impressive. But if you want to take it even further, consider adding color to bring it to life. You don’t have to go all-out with colors right away. Start with basic hues to see what looks best.
A fire-breathing dragon could be bright red, orange, or gold, while a dragon from an icy realm might have shades of blue, white, or silver. Use colored pencils or markers to add your chosen shades. Be sure to blend the colors smoothly, adding darker tones to create depth and lighter ones to highlight.
If you prefer to keep your dragon in black and white, you can experiment with contrast, making the light and dark areas more dramatic to add an extra layer of intensity.
Step 7: Troubleshooting Your Dragon Drawing
Sometimes, even after you’ve finished drawing, things might not look quite right. But don’t worry—that’s normal! Here are some tips to help when things go wrong:
-
Wings feel too small? Try reworking them larger and more dramatic.
-
Is the posture stiff? Observe real animals in motion to capture more dynamic poses.
-
Proportions off? Check the size of the head compared to the body, and adjust the limbs to match the overall scale.
Keep in mind that every artist goes through a phase of trial and error. The more you practice how to draw a dragon, the more skilled you will become.
Why Drawing Dragons Is So Powerful
Drawing dragons is more than just a fun activity—it’s a gateway to expressing creativity, storytelling, and personal imagination. Every dragon you sketch carries a part of your own creativity, just as every detail reflects your unique vision.
How to draw a dragon is not just a lesson in anatomy or technique; it’s a journey of exploration. Dragons are mythical, fantastical creatures, and drawing them allows you to tap into that mystery and power.
By creating dragons, you not only develop your artistic skills but also get a chance to imagine new worlds. What stories can you tell with your dragon? What adventures await it in the realms of your imagination?
Conclusion: Keep Drawing, Keep Dreaming
Congratulations, you now know how to draw a dragon! But remember, the learning never stops. With every dragon you draw, you’ll discover new techniques, experiment with different styles, and push the boundaries of your imagination.
So, pick up your pencil, and don’t hesitate to sketch your next legendary dragon. With a little patience, practice, and creativity, you’ll soon be drawing dragons that will captivate everyone who sees them.
Meta Description:
Learn how to draw a dragon with this step-by-step guide that breaks down the process for beginners. Unleash your creativity and bring your mythical creatures to life.