
As a kid, I remember watching my grandma draw flowers in her small notebook near the window. She often told me, “Roses are the heart of nature’s poetry.” I didn’t quite understand what she was talking about then. But one rainy afternoon, I found magic when I attempted to copy her drawing. It was my first attempt at learning how to draw a rose.
This article is not merely a step-by-step guide. Instead, it’s a tender exploration of memory, creativity, and growth. Whether you’ve never held a pencil in your life or you’re falling in love with art all over again, I’ll walk you through the process with clear and simple steps. Like my grandmother did for me, I hope to inspire you along the way.
Why Drawing a Rose Matters
Roses are more than beautiful blossoms. Indeed, they come laden with deep feelings, timeless tales, and potent symbols. One flower can symbolize love, loss, hope, or a fresh start. This is one of the reasons that learning how to draw a rose isn’t just a skill; it’s a way of expressing how you feel on paper.
You may think it’s too complicated. All those petals and curves can be intimidating at first. But don’t worry. Once we deconstruct it into its simple components, you’ll see it’s much simpler than you thought. More importantly, it’s fun.
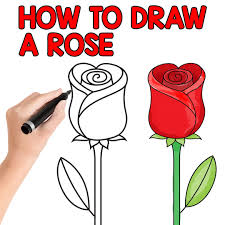
Step-by-Step: How to draw a Rose
Now, let’s get into the actual process. Before we start, take a pencil, an eraser, and a blank piece of paper. Ready? Okay, let’s begin your rose-drawing journey.

Draw the Rose’s Center
Begin in the center of your paper with a small spiral. This spiral is the center of the rose, where it all starts. The advice here is to keep your hand loose and your lines casual. It does not need to be perfect. That’s the thing, though: it’s only the beginning.
Build the Inner Petals
Then, draw curved lines around the spiral. The petals themselves, tucked close as can be. Be sure to overlap them a bit since it creates a natural depth in the rose. Be slow and soft with your hand. Your drawing will blossom nicely like a real rose.
Add the Outer Petals
Make your flower bigger by drawing larger petals around the inner petals. They each should open up just a little to let the rest bloom. The shapes have little variety because real roses are not perfectly symmetrical. That little detail makes a huge difference.
Sketch the Base and Stem
Now, let’s make the base drawing. Draw a slight coffee cup shape beneath the petal. This is the place where all the petals converge. Then, draw a long curved line going down for the stem. Add a few leaves by creating simple teardrop shapes. These make your rose feel more grounded and complete.
Add Details and Texture
Once the structure is complete, you can bring your rose spring to life. Make sure to lightly shade areas of the petals, including the part closer to the center, to suggest depth and form. Also, add some soft lines on the leaves and stems for texture. This sort of thing gives your drawing personality, small details like this.
Go Over with Pen (Optional)
Lastly, draw over your drawing with a fine-tip pen if you want it to pop. This step is optional, though it gives its definition. When the ink has dried, carefully rub off any pencil guides drawn underneath. Your rose is now ready to grow!
Common mistakes and how to avoid making them
Even the best artists make mistakes from time to time. So don’t be disheartened if your first rose doesn’t look quite like what you envisioned. These are a few common mistakes — and how to correct them.
Too regular petals: Remember, actual roses are not symmetrical. Do not make each petal the same in size or shape.
Pushing too hard: Go light; do not press harder. This means you can erase and modify on the go.
Skipping steps: Each step builds upon the previous, so don’t rush. Let your drawing get the attention it deserves.
How to Make Your Rose Drawing Even Better
Your confidence and skills will steadily improve over time. In the meantime, here are some tips to guide you:
Use real roses as references. Mother Nature is the best teacher of all.
Train from different perspectives. For instance, attempt to draw a rose from the side instead of straight on.
Add color. Colored pencils or watercolors — something about adding color makes your rose feel alive.
Keep a sketchbook. Just five minutes of daily practice can make a huge difference.
A Personal Reflection
I still have the first rose I ever drew. It’s locked away in the notebook of childhood dreams. The lines are shaky, and the petals are uneven — but I love it all the same. It also reminds me of how much I’ve grown and how much joy can come from art.

However, drawing a rose goes beyond technique. It has to do with emotion, patience, and self-expression, too. Every rose you sketch is your narrative, sketched in curves and shadows.
Conclusion: The Key To Your Artistic Bloom
Now that you know how to draw a rose, you are becoming an artist. You’ve created something beautiful with every petal, line, and hue. Isn’t that incredible?
Your roses may, of course, appear differently each time. But that’s the thing about art—it grows with you. So, own your style, practice, and start over often.
Begin with a spiral tubing, put in a few petals, and your imagination will take over.
Meta Description:
A step-by-step guide on how to draw a rose for beginners. Learn simple techniques with personal inspiration and easy-to-follow step-by-step.