There’s something comforting about the smell of melted chocolate drifting through the kitchen. It’s warm, sweet, and a little nostalgic. But if you’ve ever tried to melt chocolate chips and ended up with a stiff, grainy lump instead of a smooth, glossy pool, you’re not alone. Knowing how to melt chocolate chips properly is a small but powerful kitchen skill that makes all the difference.
I still remember my first attempt. I dumped a whole bag of chocolate chips into a saucepan, turned the flame on high, and walked away for just a moment. When I came back, the chocolate had turned dry and crumbly. I thought I’d ruined it for good. What I didn’t realize then was that chocolate is sensitive — it needs gentle heat and a little patience. Once I learned the right way, the process became almost relaxing.
Whether you want to drizzle chocolate over fruit, dip cookies, or make ganache, understanding how to melt chocolate chips will make your desserts look and taste more professional. The good news? It’s actually really simple.
🍫 Why Chocolate Chips Melt Differently
Before we dive into methods, it helps to understand what makes chocolate chips unique. Unlike chocolate bars, chips are designed to hold their shape during baking, thanks to stabilizers. That’s why they stay in neat little morsels inside your cookies. But this also means they don’t melt as easily — they need slow, controlled heat to transform smoothly.
🌟 Method 1: How to Melt Chocolate Chips in the Microwave
If you’re short on time, the microwave is the quickest way to melt chocolate chips. It might sound risky, but with the right technique, it’s foolproof.
-
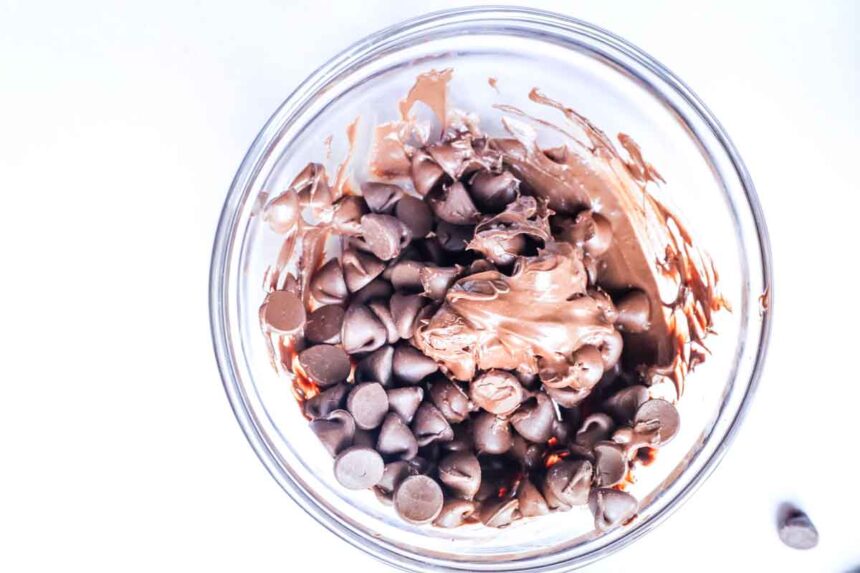
Pick the Right Bowl:
Use a microwave-safe glass or ceramic bowl. Make sure it’s completely dry — even a tiny drop of water can make chocolate seize. -
Heat Gently:
Pour the chocolate chips into the bowl and microwave on 50% power for 30 seconds. Take it out and stir well. It might not look melted yet, but stirring helps distribute the heat evenly. -
Continue in Short Bursts:
Microwave again for 15–20 seconds at a time, stirring after each round. As the chocolate warms up, it will slowly turn glossy and soft. -
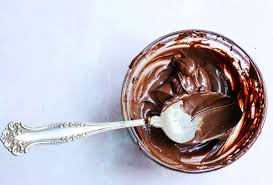
Finish by Stirring:
When about 80–90% of the chips are melted, stop microwaving. The remaining heat will melt the rest as you stir. This step keeps the chocolate smooth and prevents burning.
✅ Tip: If the melted chocolate feels a bit thick for dipping or drizzling, add a teaspoon of vegetable or coconut oil and stir until silky.
🔥 Method 2: How to Melt Chocolate Chips on the Stove
If you prefer more control or are working with a larger amount of chocolate, the stovetop (double boiler) method is perfect. It’s slower but safer, especially for beginners.
-
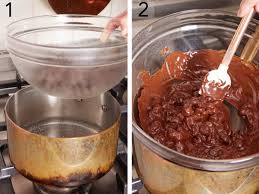
Set Up a Double Boiler:
Fill a saucepan with about 1–2 inches of water and bring it to a gentle simmer. Place a heatproof bowl on top, making sure it doesn’t touch the water. -
Add the Chips:
Pour the chocolate chips into the bowl. The steam will gently heat the bottom of the bowl, melting the chocolate slowly and evenly. -
Stir Constantly:
Stir as the chocolate melts. Once most of it is melted, remove the bowl from the heat and keep stirring until smooth. -
Watch Out for Steam:
Avoid getting any water into the chocolate — even a few drops can make it seize and become grainy.
✅ Tip: This method keeps the chocolate warm longer, making it great for dipping strawberries, pretzels, or cookies.
🚫 Common Mistakes and How to Fix Them
Even when you follow the steps, things can sometimes go wrong. Here’s how to handle common issues:
-
Chocolate Seized (Thick and Grainy):
Add 1 teaspoon of hot water at a time and stir quickly. This can sometimes smooth it out again. -
Chocolate Burned:
Unfortunately, burned chocolate can’t be saved. The best fix is prevention: always use low heat and short bursts. -
Chocolate Too Thick:
Stir in a little neutral oil to loosen the texture for dipping or drizzling.
🍰 Fun Ways to Use Melted Chocolate
Once you’ve mastered how to melt chocolate chips, the possibilities are endless. Melted chocolate can take your desserts from simple to stunning. Here are a few easy ideas:
-
Dip fruit like strawberries, bananas, or apples for a quick treat.
-
Drizzle over cakes, brownies, or pancakes to add a glossy finish.
-
Make chocolate bark by spreading melted chocolate on parchment and topping it with nuts or dried fruit.
-
Create homemade truffles by mixing melted chocolate with cream, chilling, and rolling into balls.
-
Decorate cookies or cupcakes with piped chocolate designs.
🌡 Storing and Reheating Melted Chocolate
If you have leftover melted chocolate (which doesn’t happen often!), store it in an airtight container. It’ll keep at room temperature for a day or two, or in the fridge for about a week. To re-melt, warm it gently in the microwave using short intervals, or place it back over a double boiler, stirring until smooth.
✨ Final Thoughts
Learning how to melt chocolate chips might seem like a small thing, but it’s one of those skills that can elevate your baking game instantly. Once you understand how chocolate reacts to heat and moisture, the process becomes simple and even enjoyable.
So next time you’re in the kitchen, slow down, take your time, and melt those chocolate chips the right way. The result? Smooth, shiny, delicious chocolate that makes any dessert feel a little more special
Meta Description:
Learn how to melt chocolate chips perfectly using easy microwave and stovetop methods. Avoid burning or clumping with simple tips for smooth, shiny melted chocolate every time.