
A tape measure is one of the most essential tools in both professional and home projects, but understanding how to read a tape measure can be a bit daunting for beginners. Whether you’re working with wood, metal, or fabric, knowing how to read a tape measure is key to ensuring that you get accurate measurements every time. In this article, we’ll walk you through the basics, provide some tips for accuracy, and answer some common questions to help you feel confident using your tape measure.
Understanding the Tape Measure
Before we dive into how to read a tape measure, let’s get familiar with its components. A standard tape measure is marked with both metric and imperial units, though some versions might only feature one or the other. For simplicity, most of our discussion will focus on the imperial system, commonly used in countries like the United States.
A typical tape measure includes the following parts:
-
The Tape Itself: This is the flexible, retractable material that holds the measurement markings. The tape can extend up to 25 feet or more, depending on the model.
-
The Hook: The metal end of the tape that is used to hook onto the edge of an object when measuring.
-
The Locking Mechanism: This feature keeps the tape from retracting while you take measurements.
-
The Numbers and Markings: The most important part of the tape is the series of numbers and lines along its length.
Step-by-Step: How to Read a Tape Measure
1. Start with the Whole Number
The largest numbers on a tape measure indicate the foot or inch increments. The whole numbers are typically marked every 12 inches or one foot. If you’re measuring a length of 3 feet, for example, you’ll find a “3” or “4” on the tape, indicating the beginning of each foot.
2. Understand the Inches
The next set of numbers between the whole foot numbers represent inches. Each foot on a tape measure is divided into 12 inches. If you’re measuring a length of 4 feet, 3 inches, you’ll see the number “3” at the 3-inch mark, the number “6” at the 6-inch mark, and so on.
3. Identify the Fractional Inch Marks
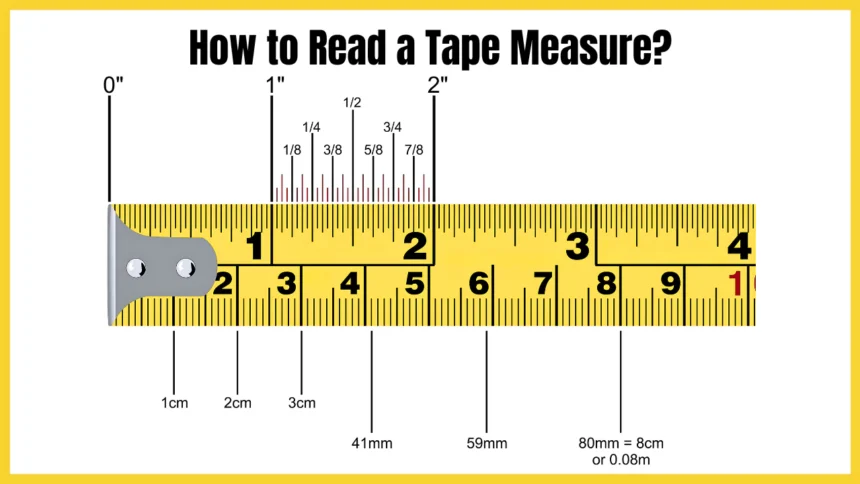
Now, here’s where it can get a bit more detailed. Between each inch marking, there are additional lines that divide the inch into fractions. Here’s how to read them:
-
1/2 Inch: The longest line after the inch mark is typically the 1/2-inch mark.
-
1/4 Inch: The next longest line represents the 1/4-inch mark, and there are four of these between each inch.
-
1/8 Inch: These are smaller lines that divide the space between 1/4-inch marks.
-
1/16 Inch: The smallest lines divide the space into 16ths.
For example, if the tape shows a line slightly past the 2-inch mark, but before the next 1/4-inch line, it would indicate a measurement of 2 1/8 inches.
4. Read the Measurement
To get a complete reading, look for the position of the edge of the tape relative to the nearest marking. It’s important to note whether the hook is positioned inside or outside the object you’re measuring, as this can slightly alter the reading.

Tips for Accurate Measurements
Knowing how to read a tape measure is one thing, but using it correctly is another. Here are a few tips to help ensure your measurements are as accurate as possible:
-
Avoid Pulling the Tape Measure Too Tight: Stretching the tape can distort your reading. Use a relaxed grip when measuring.
-
Use the Right Side of the Tape: Be mindful of the tape’s hook. When measuring an inside dimension, hook the tape on the edge of the object. For an outside measurement, measure from the opposite end.
-
Always Double-Check: It’s always a good practice to measure twice to avoid mistakes.
-
Use a Ruler for Fine Measurements: If you’re working with very precise measurements, consider using a ruler or caliper for more accuracy.
How to Read a Tape Measure in Different Units
Many tape measures feature both imperial and metric measurements, but how do you switch between the two? While reading a tape measure in the metric system is similar, you’ll find different marks for millimeters and centimeters.
-
Centimeters (cm) are the larger markings, with each centimeter divided into 10 millimeters.
-
Millimeters (mm) are marked as smaller lines between the centimeters.
For example, in the metric system, 1.5 cm would be represented by the first longer mark after 1 cm.
Common Mistakes to Avoid
Even the most seasoned DIYers and professionals can make mistakes when using a tape measure. Here are some common errors and how to avoid them:
-
Reading the wrong line: It’s easy to misinterpret fractional marks, especially when working with 1/8 or 1/16-inch divisions.
-
Measuring from the wrong end: Sometimes people forget that the hook on the tape measure is meant to slide slightly, compensating for its thickness. Always ensure you’re measuring from the correct side.
-
Not taking the hook into account: Always account for the slight movement of the hook, especially if you’re measuring an edge or using the tape’s hook for a precise start point.
How to Read a Tape Measure in Inches and Feet
If you need to measure a length in feet and inches, the process is simple:
-
Look for the foot markings, which are usually larger numbers, typically indicated by a “’” mark.
-
If you need to break it down further, use the inch markings to note the smaller increments within the foot.
-
Combine the feet and inches for your final measurement.
For example, 4 feet, 5 inches is indicated by the number “4’” followed by the number “5” at the 5-inch mark.
FAQs About How to Read a Tape Measure
Q1: How can I measure in fractions of an inch accurately? To measure in fractions of an inch, count the marks between the inch numbers. Each line represents a specific fraction (1/4, 1/8, 1/16), so use the longest lines for 1/2-inch, smaller lines for 1/4-inch, and so on.
Q2: What is the purpose of the hook at the end of the tape measure? The hook allows you to measure from the edge of an object. It compensates for its own thickness by sliding a little bit, which ensures accuracy when measuring both inside and outside dimensions.
Q3: How do I measure curved surfaces with a tape measure? To measure a curved surface, use the tape measure to gently follow the curve and keep the tape as flat and straight as possible. For more complex curves, a flexible ruler or fabric measuring tape may be more suitable.
Q4: Can I use a tape measure for metric measurements? Yes, many tape measures come with both imperial and metric measurements. You can easily switch between the two by reading the appropriate scale.
Q5: How do I measure beyond the length of my tape measure? If you need to measure something longer than your tape’s full length, use a combination of measurements. For example, measure one section, note the measurement, then roll out the tape further and add the additional length.
Conclusion
Now that you know how to read a tape measure, you’re ready to take on your next project with confidence. With practice, you’ll become quicker and more precise, ensuring that your measurements are always spot-on. Whether you’re building furniture, installing shelving, or simply measuring fabric, understanding how to read a tape measure will make all the difference. Keep this guide handy as a reference, and don’t hesitate to revisit the basics anytime you need a refresher.