📍 When Location Sharing Becomes a Lifesaver
I
It all started with a late train.
Emma was heading home after dinner with friends. It was almost midnight, and the station was eerily quiet. Her brother texted, “Let me know when you get home.” Rather than sending a dozen updates, she decided to try something new—share her location on her iPhone.
Within seconds, he could see exactly where she was. No more constant check-ins. No stress. Just peace of mind. That’s when Emma realized how valuable it is to know how to share location on iPhone—especially in those little everyday moments that feel big.
In fact, knowing how to share location on iPhone isn’t just for emergencies. Whether you’re navigating unfamiliar streets, coordinating plans, or just letting someone know you’re safe, this feature is a small but powerful tool that simplifies connection and builds trust.
💬 First Things First: Sharing in Messages
For starters, the Messages app is one of the quickest ways to share your location. If you’re already chatting with someone, then you’re just a few taps away.
Here’s what you need to do:
-
Open Messages.
-
Tap the conversation of the person you want to share with.
-
Next, tap their name or picture at the top.
-
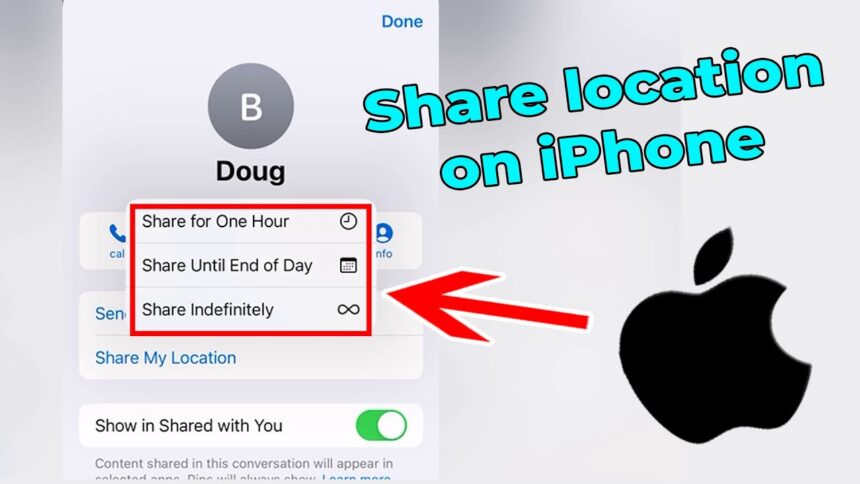
Then, tap “Share My Location.”
-
After that, choose how long to share it:
-
For one hour
-
Until the end of the day
-
Or indefinitely
-
This method is ideal when you’re meeting up, running late, or just want someone to know where you are—temporarily or otherwise.
Moreover, it’s incredibly intuitive. Even if you’ve never done it before, the steps flow naturally.
🧭 Want More Options? Try the Find My App
If you’re looking for something more versatile, the Find My app is your best bet.
Here’s how it works:
-
First, open Find My from your home screen.
-
After that, tap the “People” tab.
-
Then, choose “Share My Location.”
-
Enter the contact’s name, phone number, or Apple ID.
-
Tap Send.
-
Finally, pick how long you want to share your location.
Not only does this method offer live tracking, but it also allows notifications. For instance, you can get alerts when someone arrives or leaves a location.
Because of these advanced options, this method is perfect for families or close friends who want to stay connected long-term.

🗺️ On the Move? Share ETA with Apple Maps
Sometimes, it’s not just about where you are—it’s about where you’re going. Thankfully, Apple Maps makes this easy.
-
Start navigation to your destination in Apple Maps.
-
Once your route is visible, swipe up from the bottom.
-
Tap “Share ETA.”
-
Select your contact.
From that moment on, they’ll not only see your estimated time of arrival, but also track your live progress.
Even better, if traffic slows you down, they’ll see the update instantly—no need to send another text.
📇 Quick Access: Share Straight from Contacts
If you’re browsing your Contacts app and think, “Hey, I want to let them know where I am,” there’s a shortcut for that too.
-
Open the Contacts app.
-
Tap the person’s name.
-
Scroll down and tap “Share My Location.”
-
Select the duration.
Whether you’re planning a surprise or coordinating errands, this method keeps things fast and simple.
🛑 Need to Stop Sharing? You’re in Control
Of course, sometimes you’ll want to stop sharing your location—and that’s completely okay. Just like learning how to share location on iPhone, knowing how to stop sharing is just as important for keeping your privacy in check.
To stop in Messages:
-
Tap the contact’s name.
-
Tap “Stop Sharing My Location.”
To stop in Find My:
-
Go to the People tab.
-
Tap the person’s name.
-
Then tap “Stop Sharing My Location.”
If you’ve already learned how to share location on iPhone, then you’ll find turning it off just as easy. Importantly, you’re never stuck. You can start or stop sharing at any time—and always stay in full control of your own space.
🛡️ A Few Words on Safety and Boundaries
Before we go any further, let’s talk about safety. Yes, location sharing is useful, but like any tool, it needs to be used wisely.
Here are a few key tips:
-
Always share with people you trust.
-
Never choose “Indefinitely” for someone you barely know.
-
Remember to check who can see your location from time to time.
-
Don’t forget to disable sharing after events or trips if it’s no longer needed.
Although this feature is helpful, your privacy still comes first.
🧰 Troubleshooting: If Things Don’t Go Smoothly
Every now and then, you might run into a hiccup. But don’t worry—most issues are easy to fix.
For example:
-
If location isn’t updating, check your internet connection.
-
If someone can’t see your location, make sure you’re both using Apple devices.
-
Additionally, verify that Location Services is turned on (Settings > Privacy > Location Services).
-
You might also try restarting your phone, which often clears things up.
As a result of these steps, things usually start working again in no time.
✨ Why This Tiny Feature Matters So Much
Let’s step back for a moment.
Yes, this is a tech feature. But more than that, it’s about human connection. Whether you’re meeting friends, checking in with your kids, or helping someone find you during a storm, knowing how to share location on iPhone can bring peace, safety, and simplicity to your day.
In fact, it’s one of the easiest ways to stay emotionally close—even when you’re physically far apart.
✅ Quick Recap Before You Go
-
Use Messages for fast, short-term sharing.
-
Choose Find My for deeper control and ongoing connections.
-
Try Apple Maps for sharing while on the move.
-
Use Contacts if you’re already looking at someone’s info.
-
Stop sharing anytime—it’s your choice.
-
Stay safe and check your settings often.
Whether you’re out on a hike, traveling overseas, or simply grabbing coffee with a friend—this small feature has a big impact.
So next time someone says, “Where are you?”, you’ll have the perfect answer—one tap away.
Meta Description:
Want to learn how to share location on iPhone? This warm, beginner-friendly guide uses stories, transitions, and real-life tips .